How to Use ColorMixr™ to Record Your Custom Polymer Clay Color Mixes and Discover Colors that Make Them Look Fabulous!


ColorMixr™ for polymer clay helps you remember your custom Fimo or Premo! Sculpey mixes and discover what other hues compliment them. Or use this app to recreate a clone of a color you've forgotten how to make. Also find new uses for scrap clay by finding colors that make those unusual colors really pop!
All those things are easy with ColorMixr's "Record new color" feature.
Custom Color Questions
- How do you record my custom color mixes so that I don't forget them?
- What colors will look great with you custom polymer clay color recipe?
- How do I copy a color that you've forgotten how to make?
HAVE MORE QUESTIONS??? Start the User Guide from the beginning at the link. If you don't see what you're looking for there we are available to answer your questions pronto. Contact information in in the "Troubleshooting" section.
Let's record some custom colors!
How do you record custom color recipes on ColorMixr™ so you don't forget them by next week?
Let's walk thru an example together:

1) Open ColorMixr™ to the "My palettes" page and tap on the main menu and then select "Record new color"
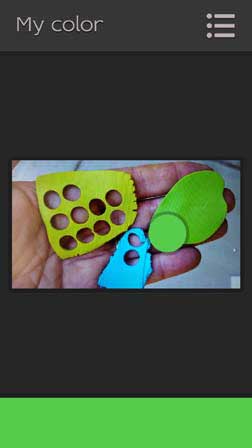 #1) "My color" screen
Your device's photo taking app will open. Take a picture of your custom polymer clay mixture. I'm holding the mixed clay and the original colors in my hand here.
You will be asked if it is ok to use the image.
2) Select "Ok".
3) On the "My Color" screen (see image #1) you will see the polymer mix photo with ONE color sampling circle. Choose your color. Move the circle to the shade on the screen that is closest to what you want to remember for that color mix's hue. The color bar at the bottom also shows the color that you've chosen.
The color circle that I moved is at the left tip of the green sheet without holes.
4) Go to the main menu again and select "Next (configure)".
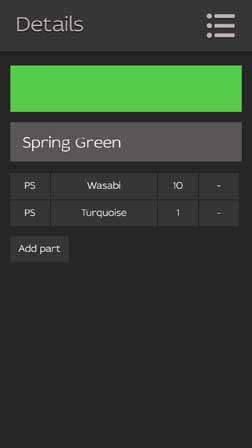
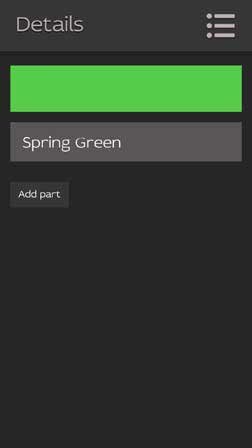 #2) "Details" screen
5) (See image #2) You arrive at the "Details" page . Name your custom color in the "Color name goes here" box. I chose the name "Spring Green".
6) Then click the"Add part" button.
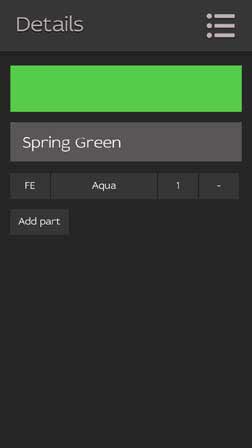 #3) "Details" - Add Part
(See image #3) You are now at the actual recipe recording section. And will see a row of four boxes. They are FE, Aqua, 1 and a minus sign (-).
7) Click on the first box (FE) to choose the brand of clay for the first ingredient in your color recipe. Your choices are:
- FE - Fimo Effects
- FP - Fimo Professional
- PA - Premo! Accents
- PS - Premo! by Sculpey
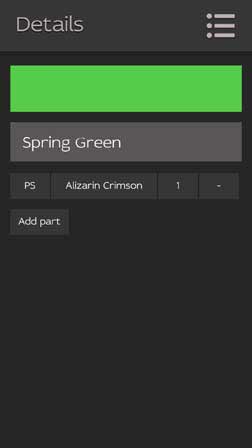 #4) Changing brands
(See image #4) For our example we'll click on PS. You'll notice that the contents of the second box have changed. Instead of "Aqua" it now reads "Alizarin Crimson". Tap on the Alizarin Crimson and you'll see a list of all the current manufacturer's packaged colors in the Premo! Accents line.
8) Tap to select the package name of the color that you used as your first ingredient in your custom ColorMixr™ recipe. In our example, I used Wasabi.
That takes you back to the "Details" screen. And you'll notice that the contents of the second box have changed to "Wasabi".
9) Now record how much of your first color is in the mix. As you can see from the original photo, I used 10 parts of Wasabi. Tap the box to the right of "Wasabi" with the "1" in it. You'll see a list of numbers from 1 to 30. Tap the "10". You'll be returned to the "Details" screen.
Now the first line of your custom color formula reads: | PS | Wasabi | 10 | — |
 #5) Adding packaged ingredients to your recipe
10) Add a second color by Clicking "Add part".
You'll see another line added to your formula. Again it starts with the |FE|Aqua|1|–| line.
11) Tap on the "FE" and select "Premo Sculpey" from the list. That changes the contents of the first box in our second color recipe ingredient to "PS".
12) Tap on the second box in your recipe list which now says "Alizarin Crimson" and change the entry by selecting "Turquoise" from the scrolling menu of Premo! Sculpey colors.
13) Tap the "1" box next to your new "Turquoise" entry and select "2" from the drop down list.
Your screen will look something like this. (See image #5).
Keep repeating steps 7 to 13 to add more packaged colors to your custom polymer clay mixing recipe.
OOPS - You made a Mistake? Go back to any of the boxes and change any entry. Then save it again in the main menu. If you want to delete an entire line from your ColorMixr™ recorded color formula click the " — ".
14) Save it! When your ColorMixr™ recipe ingredients are complete go up and tap the main menu icon again. Select "Save" to create a record of your new color. Or click "Back" to edit the color you selected, the name, or any of the packaged ingredients to your recipe.
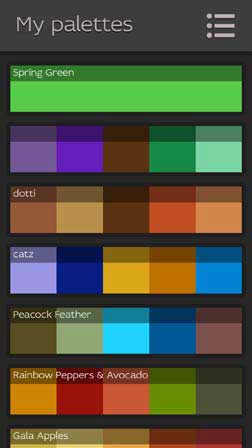
15) If you saved, you'll see a new entry on the "My Palettes" screen with only one color that has the name of your custom hue on it. In my example it's "Spring Green".
MIX or MATCH Brands! When you are adding your own recipes you do not have to stay within one brand. For instance, you can record a recipe which contains create separate ingredients entry lines for:
- Fimo Effects Ruby Red
- Fimo Professional Lavender
- Premo! Accents Magenta Pearl
- and Premo! Sculpey Periwinkle (interesting combo — try it for yourself!)
Find ColorMixr™ palettes that make your custom color look great!
 #6) Choose custom color palette
Following these instructions will create a new palette that contains 1 base color that's a close clone of your custom color mix and 4 more colors that will compliment it.
Creating this palette will not alter your custom "Record new color" hue or its recipe.
1) Choose a custom recorded color. At the "My palettes" screen, tap on the one color palette bar that was created when you went through the "Record new color" process above. (See image #6)
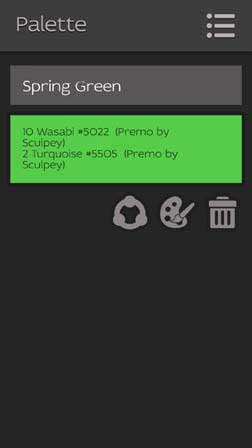 #7) Custom color palette screen
2) This will open the "Palette" screen with the record of the Fimo or Premo! Sculpey packaged colors that you used to create your new custom color. (See image #7)
3) Tap the "Mixing wheel" icon. That's the one at the bottom on the left that looks like a circle with 3 balls on it.
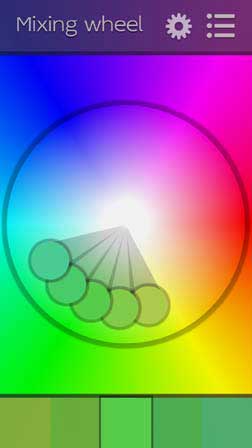 #8) Your custom color in the Mixing Wheel
4) The "Mixing wheel" screen will open. Your custom color is in the middle of both the circles on the wheel and in the color blocks at the bottom of the app. It is now the base color for all the other Mixing wheel color scheme manipulations that you can do. (See image #8)
The other four colors were chosen by the app to conform to the classic color theory Analogous color scheme.
5) Choose a color scheme. Go to the top of the screen to the gear or sprocket shape to the right of the words "Mixing wheel".
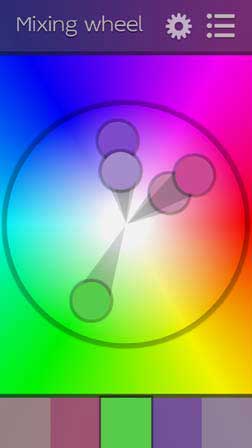 #9) Your new recorded color as the base color for a split complementary color scheme
That's where you'll find 7 different schemes from classic color theory. Your custom color will be used as the base color for all of the color schemes. (See image #9).
Click on any one of the color scheme icons:
- Custom - Move the color selection circles individually to choose each color.
- Analogous - Colors are chosen that are next to the base color.
- Triadic - Colors chosen form an equidistant triangle on the color wheel.
- Monochromatic - Colors are all different shades of the base color.
- Complementary - Two shades of the base color, base color and two shades of the color opposite the base color on the wheel.
- Split complementary - Base color, plus two shades of two colors next to the color opposite to the base color. Look at the picture. It's much easier to look at and understand than it is to read it.
- Double complementary - 4 colors arranged into two complementary color pairs, plus one shade.
6) Save the new palette that goes with your custom recorded color. Go to the main Menu icon and select the "Save" option.
7) You will return to the "My palettes" screen again. Touch your new palette at the top of the list and name your palette in the "Palettes name goes here" box. I usually call it something that shows its relationship to my custom recorded color like, "Spring Green-split complementary".
YOU ACCIDENTALLY CHANGED THE BASE COLOR! It's easy to change the base color while you're in the "Mixing wheel". You can actually spin the colors around the wheel if you'd like.
But if you didn't mean to change the base color, don't panic. Return to the Main Menu icon and select "My palettes" from the menu. Then re-select your custom color and start over again with your base color.
How Do You Copy A Color That You've Forgotten How to Make?
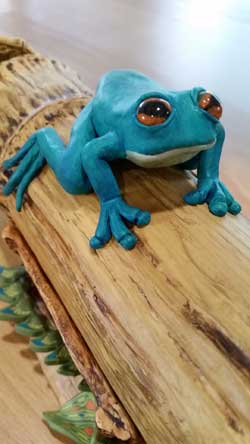 #10) Blue frog color to copy
We've all mixed a great color and did not write down the recipe. Now maybe it's years later and you want to reproduce it. With ColorMixr™ creating a color clone is much quicker and easier than its ever been before.
The process is actually the same as the "Image from camera" process at the beginning of this User Guide.
Now I've totally forgotten how to create the color that I used to create this Blue Tree Frog (see image #10). And I'd love to use it again. So I'm going to use that hue as my example:
1) Open ColorMixr™. Select the Main Menu.
2) Choose "Image from camera".
3) Your picture taking app opens.
4) Take a close-up photo of the polymer clay color that you're trying to recover. Choose "Ok".
 #11) Move color selection circles over the colors that you want to reproduce.
5) When the "Picture's palette" screen comes up, move the middle color selection circle on top of the color that you want to reproduce. Double check on the bottom squares to make sure that the color that you want to reproduce is in the middle. If it is not, move around the correct circle until the middle square at the bottom shows the color you want.
If there's room, move the selection circles over some other shades that might also be close to the color that you want to recreate.
6) Go to the top of the app and select the Main Menu icon.
7) Select "Save" from the menu options.
8) Tap on the new, top palette.
 #12) ColorMixr color palette for my blue tree frog
9) Name it! On the "Palette" screen, name your palette by typing in the "Palettes name goes here" box. (See image #12).
On iOS you'll need to tap the blue "Done" button to complete the naming process. To save the name on Android, you can just tap anywhere else but on the "Palettes name goes here" box.
10) The middle or third color recipe down on the list will be the base ColorMixr™ recipe that most closely matches the color that you're trying to recover.
The color circle at the right hand side of color recipe box will show you the difference between the base color recipe and the color you chose on the screen. This will give you a starting point to speed the cloning of the color that you're trying to recover.
Sometimes polymer clay has a color shift after baking. Bake the color recipe that ColorMixr™ has retrieved before you make any drastic changes to the recipe.
11) Record it! When you are satisfied with the recovered color, use the ColorMixr™ "Record new color" to make sure that you don't forget it!
|
|
|
Put your question right here!
Or tell us how we can help you...
Polymer Clay Home Page › Part 1-ColorMixr User Guide › Part 5 - Recording New Colors & Finding Great Palettes
Hi There!
I'm Nancy Ulrich, and I'm a Polymer addict. I live in San Diego with my husband Bob. And I've never eaten anything rolled from my pasta machine...More